Monday, October 6, 2014

Zoya Matte Velvet Swatch Session: They're Back!

Long time no see friends!!

So recently Zoya announced via Twitter that the Matte Velvets are coming back and sweet mercy this is EXCITING NEWS. The Matte Velvets are BEAUTIFUL polishes and not only that but you're getting 2 beautiful polishes for the price of one because they all also look beautiful with a shiny topcoat. I think they're all worth getting but I'm happy to show them off and let you decide for yourself!

Note: Zoya instructs that Matte Velvets should be worn without a top or base coat so as not to interfere with the matte finish. As matte polishes are almost always very pigmented, for all swatches I wore Zoya Anchor as a base coat to prevent staining and it did not noticeable impact the finish on Harlow, Savita, and Veruschka but Dovima, Loredana, and Posh were a bit satin-y when they dried. I used one coat of Zoya Armor for the top coat.

Dovima is described as a "smoky charcoal-black with strong silver shimmer." It is a beautiful rich black either matte or shiny, but when it is shiny the black has even more depth and the shimmer is stunning. I'm a big fan of black nail polish in all forms, and while it's not obvious, the fact that it's still black when matte is really lovely.
Matte:

 Shiny:

Loredana is described as a "medium gunmetal grey, packed with silvery shimmer." This was hard to capture the difference between the matte and shiny versions. Matte it has a gorgeous gunmetal appearance, but the shimmer is resplendent when it's shiny.
Matte:

 Shiny:

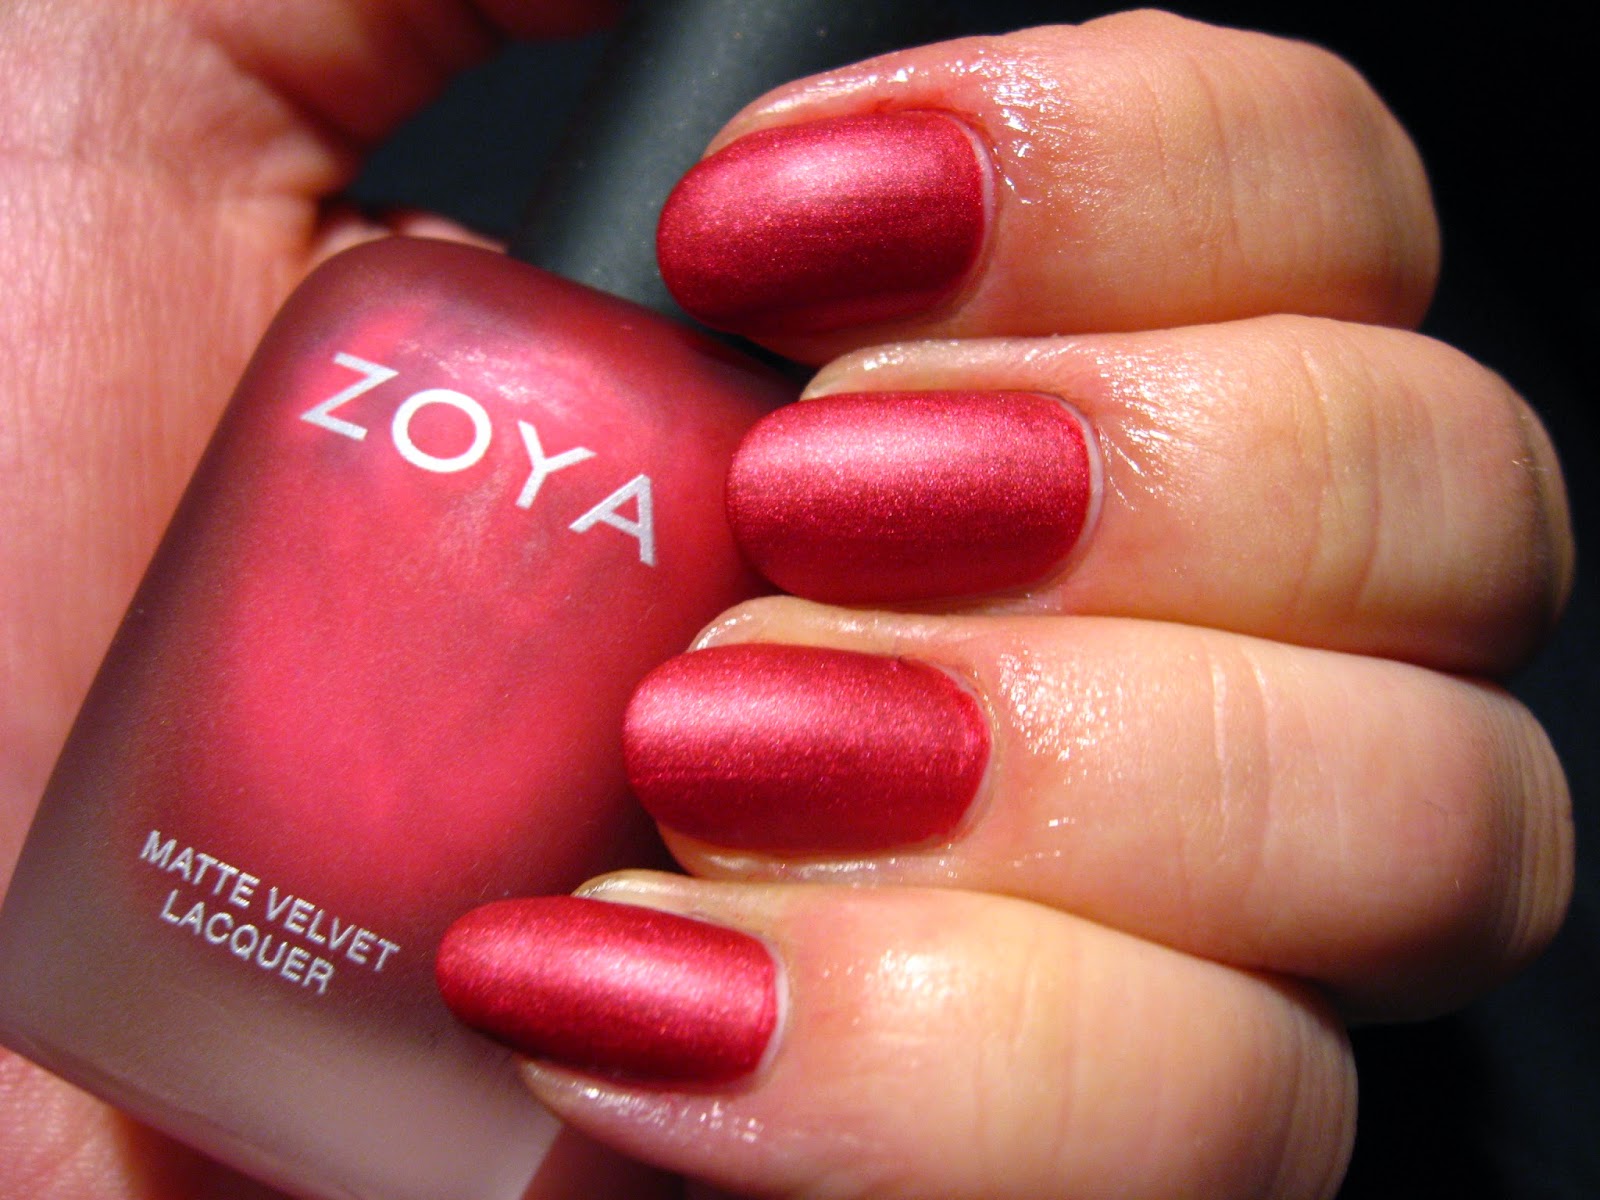
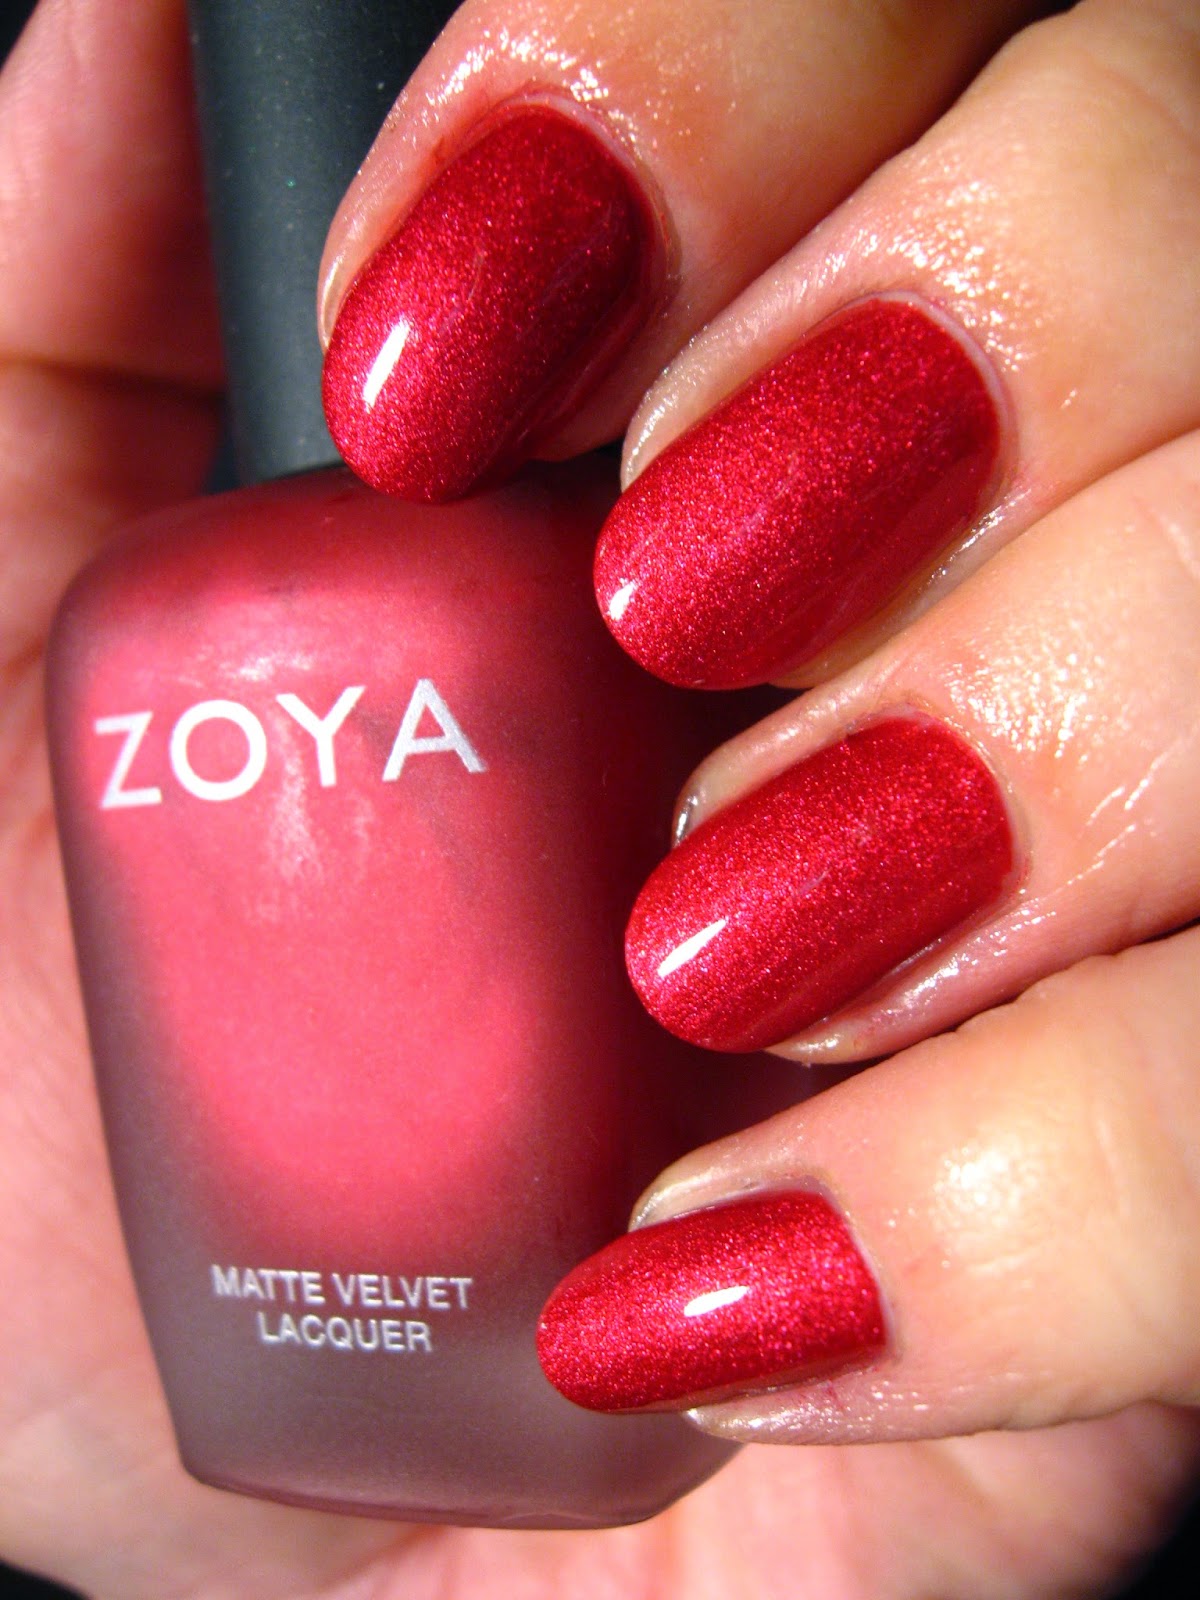
Posh is described as a "medium cool-toned wine red with metallic red shimmer." Do you see how beautiful it is? Matte the shimmer lends it a beautiful, rich tone, but shiny? Ugh it just glows.  
Matte:

 Shiny:

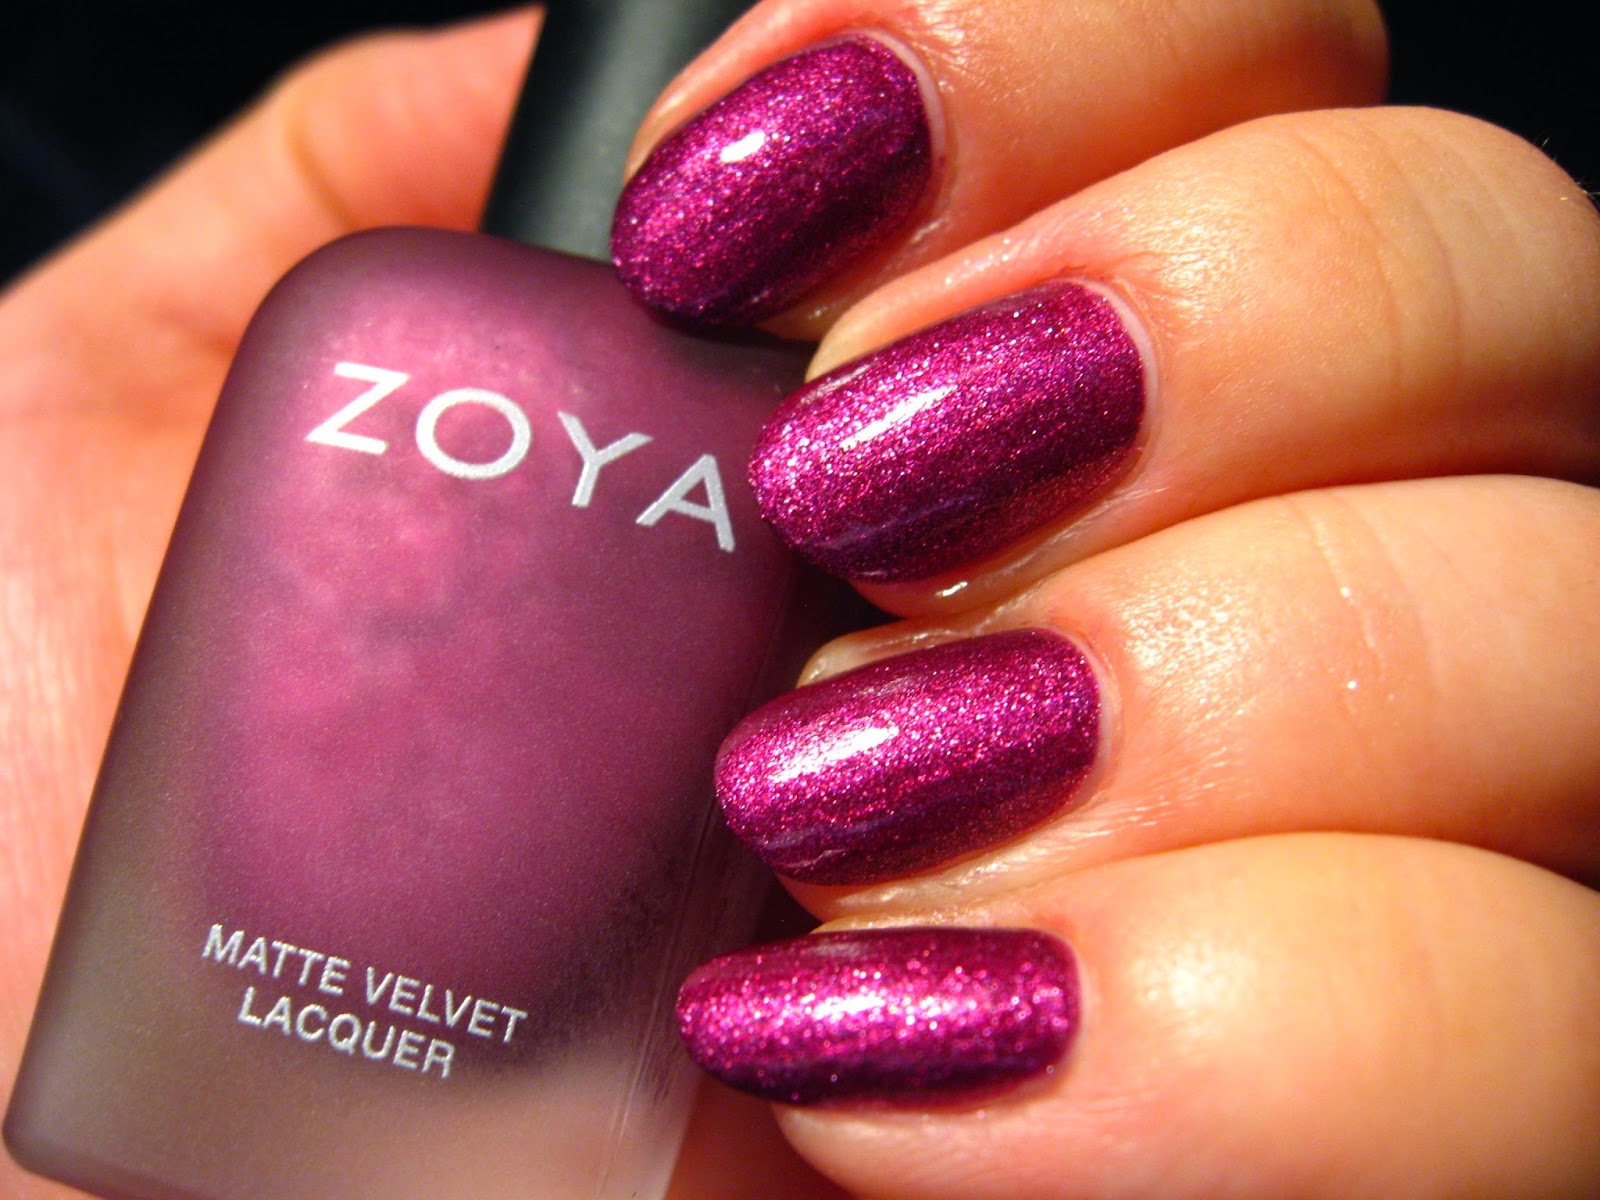
Harlow is described as a "rich, saturated rose plum packed with sparkling metallic shimmer." To be honest I wasn't super into this color when I first purchased it but after seeing it with topcoat that totally changed. The color is very pigmented matte, but it intensifies when shiny and the shimmer is amazing.
Matte:

 Shiny:

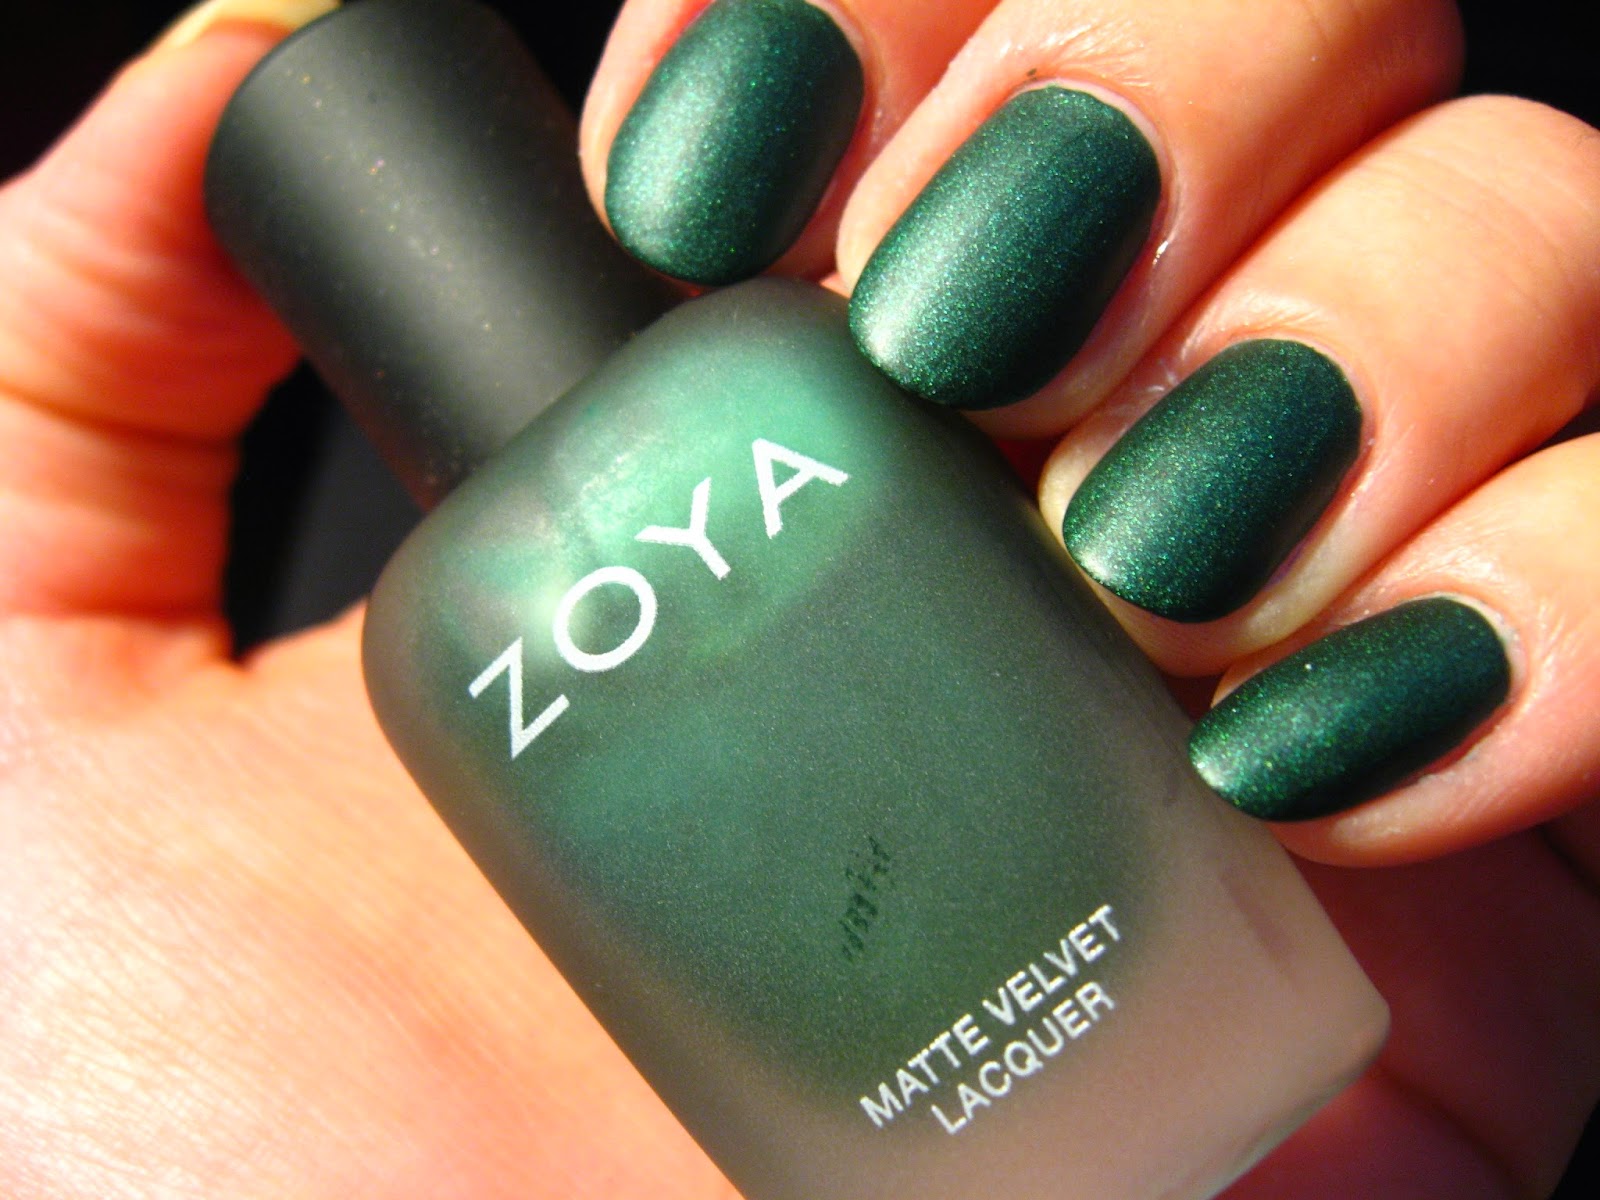
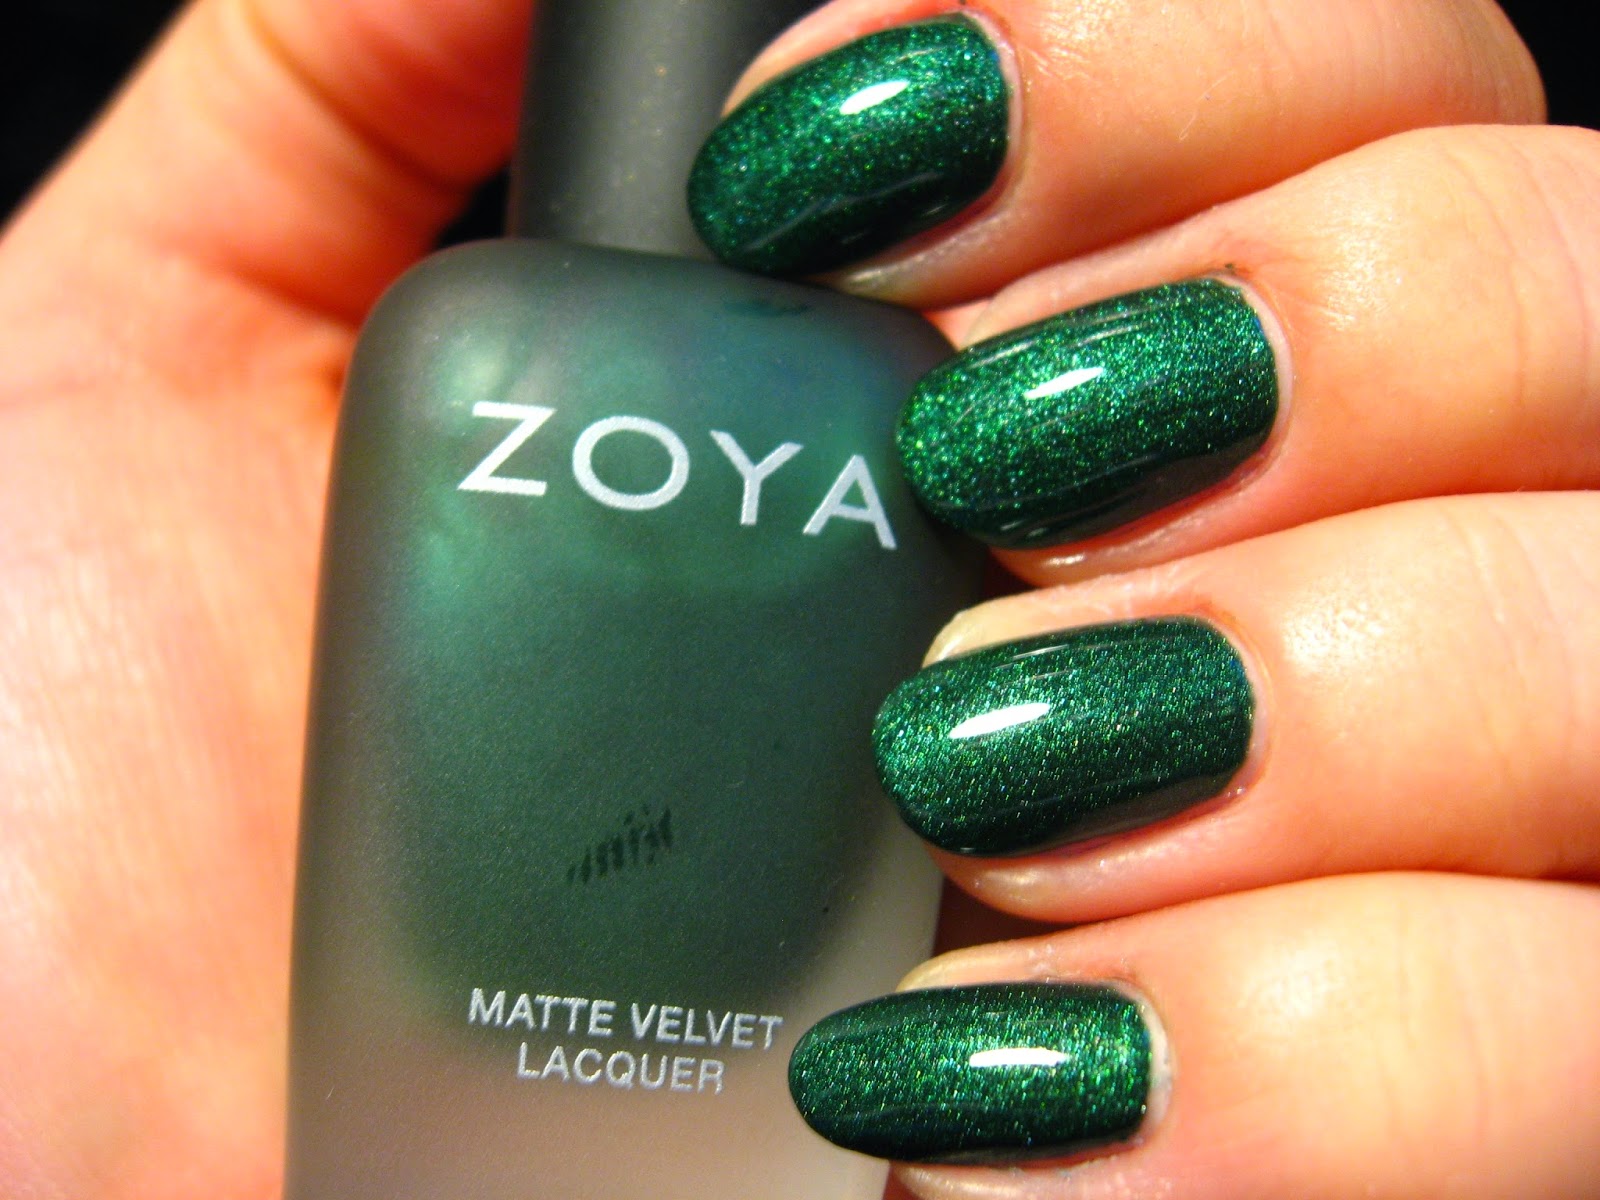
Veruschka is described as a "deep evergreen garnished with strong metallic shimmer." This is another color I wasn't very interested in, but it's so beautiful when applied. Matte, it's so smooth and just gorgeous, and when it's shiny? It's a saturated metallic green. Even though it's an "evergreen" type of green, it has a bright quality to it that's lovely, matte or shiny.
Matte:
 Shiny

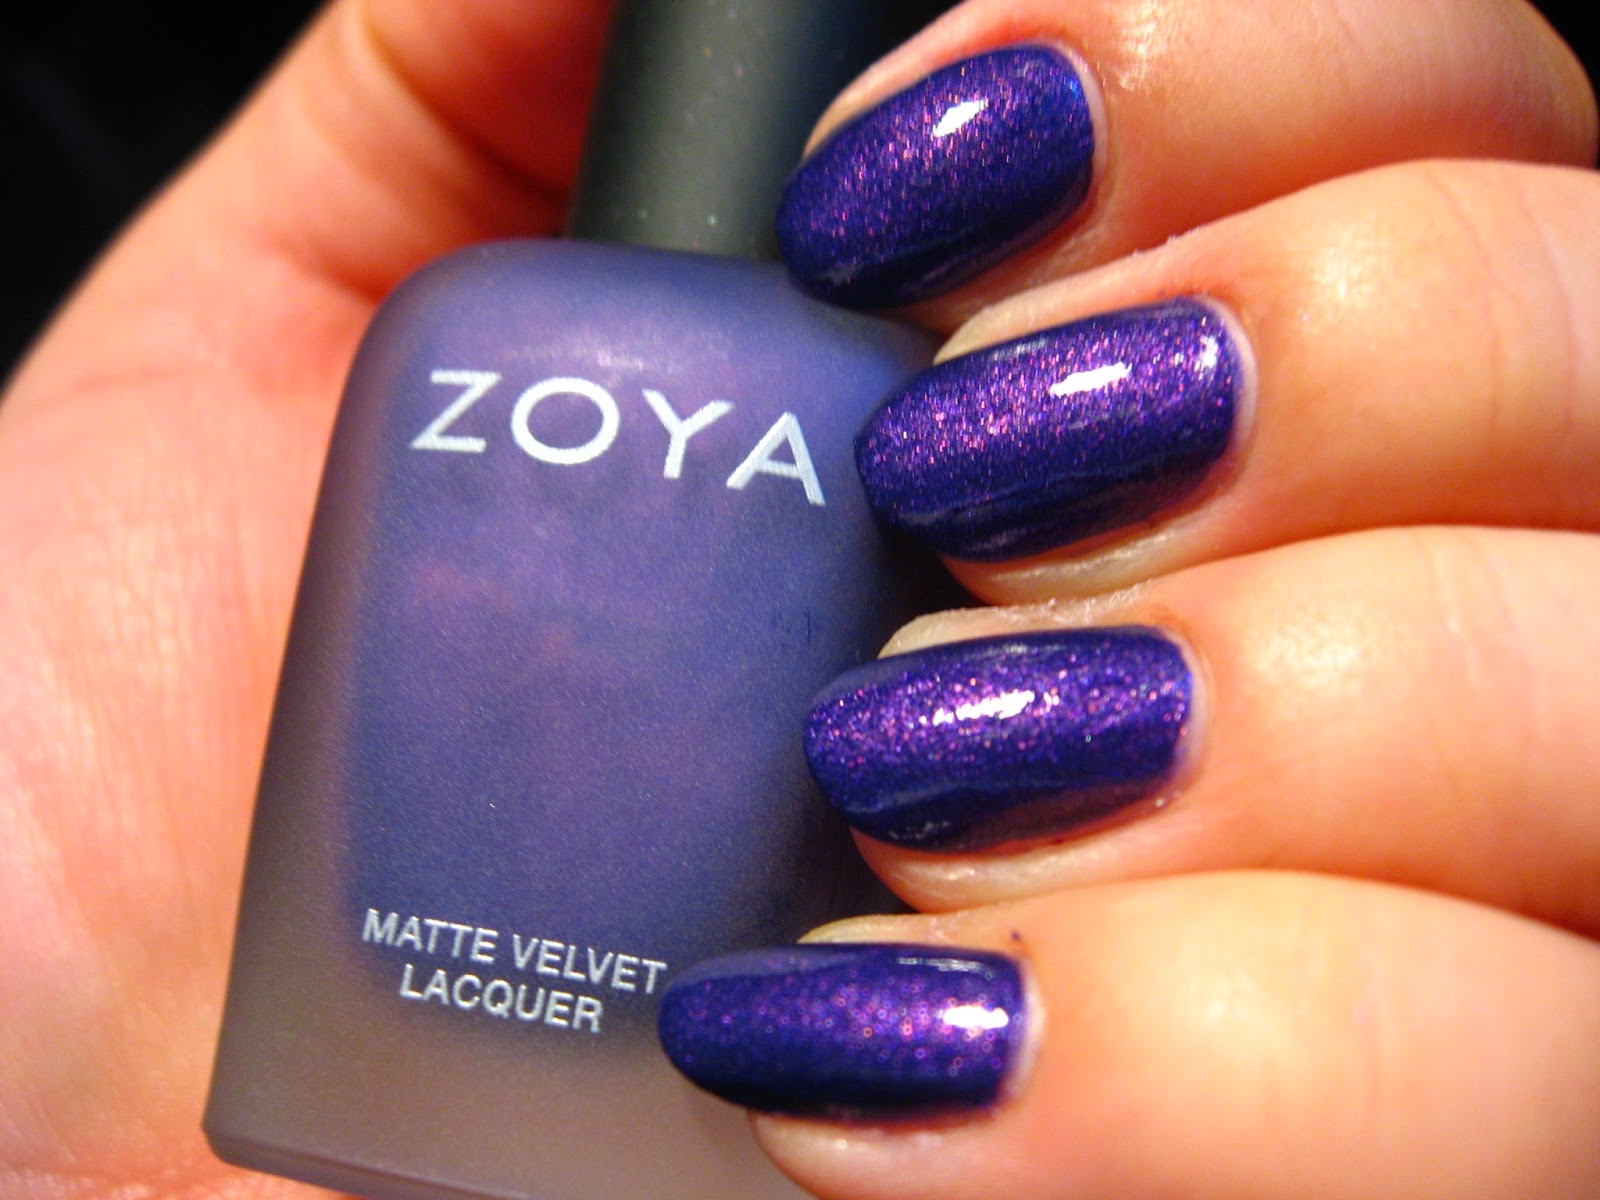
Savita is described as a "bold, vibrant medium purple with strong red and gold shimmer." Honestly this is my favorite of all of the matte velvets. I don't even have words but matte or shiny my reaction is as follows: 😍 (that's the hearts for eyes emoji). But OH MY GOODNESS THIS NAIL POLISH THOUGH. It's beautiful matte, it's beautiful shiny it's just beautiful. 
Matte:

 Shiny:


And those are all the re-released matte velvets! I personally would recommend Dovima and Savita but they're all lovely. You can get them online along with a new matte velvet top coat! I also saw a full display of the Matte Velvets at my local Ulta over the weekend so I would imagine you should be able to pick them up anywhere Zoya is sold.

disclaimer: I purchased all of the polishes in this post for my own personal use.

Monday, October 14, 2013

Oh My Glob, a Lumpy Space Princess Tutorial!

On the heels of my last post featuring Princess Bubblegum from Adventure Time, I figured now would be the perfect time to post my Lumpy Space Princess Tutorial! Why? BECAUSE I LUMPIN' LOVE LSP!


For those who do not watch AT, LSP is a purple, cloud-shaped, Princess of Lumpy Space, a dimension full of glowing nebulas, pastel clouds. She has a decidedly Valley Girl-esque lifestyle and accent. LSP is known for her sass and catchphrases, including “oh my GLOB”, “what the lump!”, and of course, “hey girl!”


One of my favorite things about LSP is she is completely unashamed of who she is and what she looks like because she knows, “when I work these lumps, no man is immune to their influence.”  She is an icon of body-positivity and being true to yourself and I will lumpin' love her until the end of time for that.  So I decided to try and put together a fresh to death look in her honor. 


For my eyes I used the following products:  MAC Paint Pot in Soft Ochre (any primer will do though), Buxom Stay There Eyeshadow in Poodle, Urban Decay Eyeshadows in Honey, Fishnet and Maui Wowie, NYX Loose Pearl Eyeshadow in Purple, MAC Kitchmas Pigment, Urban Decay 24/7 Liner in El Dorado and 24/7 Liquid Liner in Perversion.


(L-R: Poodle, Maui Wowie, Honey, El Dorado, Fishnet, NYX Purple, Kitchmas. The peachy vertical swatch on the left that you can barely see is Benefit Georgia worn as blush)

I actually made a Vine of the whole eye look, but I think it goes by too fast to outline the look properly.  
  • Soft Ochre goes all over the lower and upper lid, up to the eyebrow.  
  • Use a small, synthetic brush to apply Poodle to the inner third of the upper and lower lid.  
  • Apply the Purple Pearl Powder onto the other 2/3 of the upper lid only, and apply Fishnet into the crease, blending well.  
  • Apply Honey on top of  Poodle on the upper lid, making sure to blend very well into the purple side.  
  • On the lower lid inner third, apply Maui Wowie on top of Poodle
  • With a damp liner brush, apply Kitchmas on the outer 2/3 of the lid making sure to flick the end out past the edge of your eye.  
  • Line your upper lid with black liquid (or gel) liner, giving yourself a little bit of a cat eye to match the flick from Kitchmas.  
  • Lightly line the outer 2/3 of the lower lid with El Dorado for contrast.  
  • Fill in your brows, apply a matte, light highlight to your brow bone, mascara your lashes and you are done and OH MY GLOB GIRL you look so good!


Do whatever cleanup under your eyes you may need to do and use your favorite primer/foundation/powder to make your skin look fab. Contour your cheeks a little with your favorite matte bronzer; I use Too Faced Milk Chocolate Bronzer. After contouring, apply a sheer peachy highlighter instead of blush. For the record we are highlighting and contouring because isn't it obvie?  You gotta work those lumps girl.

And finally, any LSP look would not be complete without a set of luscious lips.  While LSP favors power reds for her lip looks, I think it would overwhelm the lumpin' awesome eye look we put together.  So I slicked on some Revlon Lip Butter in Pink Lemonade and topped it with NARS Lip Gloss in Super Orgasm.  Both shades are peachy-pink and Super Orgasm has killer shine and gold shimmer, so it really does give you luscious lips, no zombie formula required.


For my bodacious curls, I tinted my very light blonde hair lilac with a teeny bit of Special Effects Wildflower Purple mixed with a lot of conditioner, washed and conditioned my hair, put in a little Paul Mitchell Thicken Up at the roots and Garnier Hair, Face and Body Oil very lightly on the ends and went to bed with wet hair.  In the morning I put my (straight, chin length, layered) hair into 4 little bumps, I mean buns, 2 in the front and 2 in the back.  

BUUUUNS! Taken from my Instagram feed! I'm cupcakecore there if you wanna follow!
I gave each bun a shot of hot and then cool air from the hair dryer, left the buns in, and went about my day.  Maybe an hour later, I took out all the buns, spritzed my hair with Not Your Mother's Beach Spray, gently fluffed, and then scrunched in some Got2B Volumizing Powder at the roots.  I also pinned up the hair at the back of my neck because it didn't curl quite right and was kind of unsightly.


I kept my nails simple but gorgeous, opting for a rich lilac with a strong gold shimmer, Zoya Zara. It is a beautiful nail polish, and well worth the 3 coats it takes to reach opacity.


And that is my LSP look, which I think is fresh enough for promcoming or just hanging out by the fire making beans.

OH MY GLOB!
So tell me lovelies, do you adore LSP?  Or is there another Adventure Time lady who has stolen your heart?  Do share in the comments!


BUUUUUUUUMPS!

Tuesday, September 17, 2013

Girliest Girly nails ever!

Hello friends!

Have you missed me?  I've sure missed you, I hope you all are doing great!

I have just done a photo dump so expect a couple of quick drive-by posts within the next week or two.

So I've decided to share on of my favorite layered manicures of this past year!  I think I need to bust this one out again because it's so good!

I'll save the long post about how much I love Adventure Time for another day but suffice to say OH MY GLOB I LOVE IT.  Princess Bubblegum is a tough, smart, kind ruler of the Candy Kingdom.  Did I mention she's got fab style too?

So I was really pleased to have stumbled on the magical polish combo that perfectly evokes our saccharine sovereign.

The base is a slightly shimmery super hot pink from Nicole by OPI, "Still Into Pink" and it's BEAUTIFUL on its own.


But then I saw it.  Revlon Girly.  And it was love, at first sight.  Girl is a milky, cotton candy base with a fabulous mix of glitter: medium purple, magenta, and light pink hexes, small light pink holo hexes, and maybe some lilac small hexes?  I"m not even sure, all I know is I love it.  
I think this was one (dabbed) coat!

And it really does evoke P.B. doesn't it?
I believe Girly & Still into Pink are still readily available to purchase.  If I had to choose, of the two I would hands down recommend getting Girly because it's quite unique and so, so pretty.

Do you love Adventure Time?  Or really fabulous girly manicures?  Let's chat in the comments!

love and cupcakes,
Ms Meghan


Tuesday, March 19, 2013

Legal Disclaimers

So recently, the FTC updated their blogger guidelines.  UGH BUMMER.  I think it's good, because there are bloggers that are not as transparent as they should be; if only we could get photoshop guidelines, right?!  But I think on the other hand, there are online magazines and real magazines that are as opaque as can be because they don't have to follow these guidelines.  I do have a disclaimer on the right-hand side of my blog that says: "Unless explicitly stated otherwise, any products reviewed have been purchased by Ms. Meghan for review/enjoyment."  And this is still true, but I wanted to hash out the details a little bit more clearly.  So with all that being said let's get a few things out of the way.
  1. Advertorials, sponsored posts, and straight up ads.  I have not done any previous to this post, and I also don't anticipate doing any.  I am a little fish in a big blogging pond but regardless if the opportunity comes my way I will comply with FTC guidelines and make it clear that this is a sponsored post (although TBH I feel like those are pretty obvious when people do them).
  2. Affiliate links: I don't have any and I don't see myself using any in the near future. 
  3. Products sent for promotional review: I don't get products sent to me but I am not adverse to the practice.  If a company were to send me a product for review,  I would obviously disclose it and also try to give a fair, balance, review.  I don't gifts with purchase, point-of-sale samples, or in-store requested samples under this umbrella.
  4. Conflict of interest:  Okay, this one is tricky.  A few years ago I applied and was technically hired to work freelance for MAC which as an FYI is owned by Estee Lauder Companies.  And then maybe 6 months later (July 2010?) I re-submitted my paperwork so that I could correctly be input into the system and conceivably work for MAC.  However beyond my initial tryout interview I have not spent even a minute working behind the counter.  So technically while I am "employed" by MAC I've never worked for them nor have I received compensation from them.  
  5. Any links in my sidebar or within posts are websites and/or blogs I go to on my own time and do not receive compensation for providing any links.  Any links posted on my Twitter/Tumblr fall under this with the exception of reblogs/retweets for giveaways.  While technically if I won I would be receiving compensation for promoting a blog, I haven't won yet.  Also I think that's pretty transparent in the reblog/retweet. 
  6. All opinions expressed are my own and do not reflect those of my employer.  I work for a very large corporation and I have no intention of mentioning who my employer is and what they do, however I would like to make that abundantly clear.
All statements made in this post regarding the presence or lack thereof of specific types of content are true as of the date of this post but are subject to change.  Any changes in content will be reflected in clear disclosures in each post. 

Monday, December 31, 2012

A Triumphant and (somewhat) Fierce Return!

Hello friends!

I'm sure you all are wondering where on earth I went.  Let's make a list:
  • I worked 2 jobs over the summer which took up more of my time than expected.
  • Had to deal with a large grain weevil infestation; I shake my tiny fist at organic soba noodles which were definitely the cause!  As a result I had to throw out A LOT of food.  Ugh.  No food = no recipes.
  • Went on my first week long vacation of the year and threw my back out, for reals!  I spent the week on muscle relaxants and asleep.
  • Spilled some boiling water on myself resulting in 1st & 2nd degree burns on one arm and 1st degree burns on my chest.  I couldn't dress myself properly for at least 2-3 weeks, let alone cook or do beauty posts.  I mean I still painted my nails, because I'm pretty sure almost nothing could stop me from doing that.  ;)
  • Dealing with mental health and developmental issues that I've pretty much always dealt with but they have been exacerbated significantly in the past 6 months or so.
 It's been a heck of a year, let me tell you!  I'm pretty pleased to see 2012 go, mostly because it kind of sucked

So even though I am spending New Year's at home with Mr. Core, I thought I would post my hypothetical New Year's Eve look.  I recommend this look for anyone who is fierce and single on New Year's Eve.  It's not for the timid, as black lipstick rarely is.  But it makes a statement about how badass you are, and you don't need no one to kiss, you are amazing all by yourself!

This look was initially inspired by MAC's Strength collection.  I was SO EXCITED that Pink Pigeon (bright pink) and Party Parrot (warm, bright pink) lipsticks were coming back plus Firm Form, a black and gold lipstick?!?!  And then MAC decided not to distribute it to counters, which meant it quickly sold out online. :(  So no new lipstick for me.  But I decided to give golden black lipstick a try.  Because anyone can do a shimmery black smoky eye and neutral lips but why not try something different?


New Year's face
YEAH BLACK LIPS!
Let's do a look breakdown:

Face:
-Smashbox Hydrating primer mixed with Benefit Girl Meets Pearl
-L'Oreal True Match Lumi Foundation
-Urban Decay 24/7 Concealer
-Sonia Kashuk face powder
-Too Faced Milk Chocolate Bronzer to contour cheeks
-MAC Peachykeen blush & Lightscapade MSF to highlight

Eyes:
-Tarte Clean Slate Eye Primer
-MAC Coquette eyeshadow for my brows (I've also used Mystery)
-a mix of MAC Bare Study Paint Pot and Buxom Stay There eyeshadow in Poodle on the lid & lower lash line
-Sephora Prisma Chrome eyeshadow in Moon Beam generously on crease (it looks like it's been DC, it's a lovely pale champagne with a pink flash)
-Wet n Wild Creme Brulee on browbone
-L'Oreal Telescopic Clean Definition Mascara in Very Black

Lips:
-Urban Decay Lip Primer
-Urban Decay 24/7 Liner in Zero
-NYX Jumbo Eye Pencil in Black Bean
-NARS Soft Touch Shadow Pencil in Aigle Noire (ultimately unnecessary but what else am I going to do with it?)
-L'Oreal Colour Riche Le Gloss in The Muse's Shine which was LE but any gloss with a strong gold shimmer will do.

Basic steps:
1. Prep your face as needed.  You don't want to go overboard with blush or shimmer, the goal is clean, slightly glowing skin.  As I get oily skin pretty quickly, I opt for luminizer in my primer and a matte powder to set, but you may need to switch it up.  A light cheek contour with blush/highlighter completes the look.

2. Luminous, glowing eyes: I wanted a clean, shimmery eye look, to brighten my eyes without making them the center of attention.  Mixing pale shimmers adds depth without too much extra work and a matte shadow on the brow bone nicely balances the shimmery lids.  The look is complete with precise but not overdone brows, curled lashes and mascara.

New Year's face
3.  THOSE LIPS THOUGH.  Okay prep the heck outta your lips.  Exfoliate and moisturize, but wipe off the excess moisturizer before applying the lip primer.  Give the primer a little time to set, and then outline and partially fill in your lips with black long-wear eyeliner.  Smudge it towards the center of  your lips, and then fill your lips in with the NYX Jumbo Eye Pencil.  You can top it with the NARS pencil but I ultimately felt this step was unnecessary, as it didn't make much of a difference.  I found the easiest way to apply the gloss was to put some on the back of my hand and apply it with a lip brush, making sure to add a little extra along the cupids bow and in the center of the bottom lip.

New Year's face
SRS BIZNESS FACE!

I assure you, I tried to style my hair, it's not just bedhead.  And yes, there is a slight pink tint because I like a little bit of pink hair on the weekends.

If I had to pick a New Year's Mani, instead of the shimmery purple I'm wearing right now, it would have to be a version of my opal manicure:

opal nails
This is seven coats of nail polish, but I think the end result is SO FREAKING GORGEOUS so I don't care.  I'll do an upcoming post on this (promise!) but it is basically a white jelly sandwich with opalescent glitter & gold shimmer in between the white layers.  I think it's prettier and slightly unexpected compared to the the usual metallics.

And that's my New Year's post!  I'm definitely planning on blogging more in 2013, I've got recipes I've been working on and beauty to chat about!  Happy New Year everyone! 

love and cupcakes,
Ms. Meghan

Saturday, June 9, 2012

Friday Jams: nerdyfuntimes edition!

Hey there!

Here's a quick friday jams post while it is still friday!  (ed. note: I wrote this last night, really, and must have been really tired because I didn't actually post it, sorry!!)

Jam:
Star Wars Radio Play from the 2012 ECCC
This video features some of the best voice actors in the biz, doing some of the voices that they're most known for in a live reading of Star Wars scenes.  This includes Kevin Conroy (Batman) and TARA FREAKING STRONG (Bubbles, Twilight Sparkle, Raven and SO MANY MORE).  I could've done without so many celebrity impressions but I was still dying with laughter and I bet you will too!

Jelly:
I LOVE THIS BOOK SO MUCH.  I've read it twice now, and this past week, I started reading it, after getting about halfway through and putting it aside months ago, and honestly it's like I never left.  The premise (as I understand it) is that instead of emigrating to Israel a large portion of European Jews were given a piece of Alaska to settle in.  The story itself is a really good police procedural built within this reality and it's just perfection. 

Marmalade:
Alkaline Trio!
I love that Alkaline Trio has gotten even more catchy than they already were but they still maintain a nice air of spookiness, they are one of my go to bands when I am in a rotten mood and need to sing in the car.

That's it for this week, have a great weekend!

love and cupcakes,
Ms Meghan

Wednesday, June 6, 2012

On vanity and drivers licenses

Hello friends!

So this past weekend I realized that I absolutely had to get my license renewed which also meant a new picture! I spent part of Saturday morning watching youtube tutorials and planning my makeup, which sounds silly but if this is a picture that will be around and scrutinized for the next 5 years, I want it to look as good as humanly possible. Are you in a similar situation?  If so, then read on for my tips for a super fine license picture!

I can narrow down my license photo makeup tips to two words: Clean Definition.  For me this meant the following:
  • Bright eyes with sharp brows: Primer, a lighter than flesh-tone shadow (WnW Creme Brulee), a thin line of black eyeliner (UD Zero), and mascara.  I use a MAC shadow and brush #208 to fill in my brows.
  • Lip tint and blush: I'm a big fan of Benetint and Stila's lip crushes, and any low-shimmer pink blush.
  • Even skin: Primer (I'm really liking Tarte's primers right now), Smashbox BB Cream (or use the foundation of your choosing), concealer, and powder to set. 
I also needed the appropriate products for contouring but there was one problem, contouring was a complete mystery to me!  And maybe it's also a mystery for you?  Well mystery solved, thanks to the wonder that is the Pixiwoo youtube channel!
This video is a great guide to basic contouring and made a world of difference for me!  Now to show you what products I used:

contouring for fun and profit
Too Faced Milk Chocolate bronzer, Wet n Wild Creme Brulee eyeshadow (a perfect pale beige matte shadow, which is getting its own post soon!),  Sonia Kashuk Flushed blush, Tarte Amazonian Clay Shimmer Powder in Champagne (a pale gold/white shimmer) and a couple of Ecotools brushes.  And this is my look:

contouring for fun and profit
My goofy face.  So in case it wasn't super obvious, I only contoured the left side of my face (and was a little heavy handed with it) to give you an idea of what kind of difference contouring makes.

Since license pictures wash everything out, it's important to use a slightly heavier hand for the contour, brows and lips, while leaving your eyes and cheeks light so that they're still easily visible.  Especially your eyes, if you wear an overwhelming eye look they could be totally lost!

So in spite of all my time and effort, when I went to AAA on Saturday they told me their camera was broken and would just re-use my old picture.  Of course!  Nevertheless, I hope this helped you and here's to many lovely license pictures!

love and cupcakes,
Ms Meghan

Monday, June 4, 2012

Apologies and polish reviews!

Hello friends!

So a week went by without a peep on here, I'm so sorry!  I fell behind on blog posts and as soon as I would turn my thoughts to posting something, I caught an extreme case of writer's block!  But I'm back and I have a few new polishes to review plus one layered manicure that was so froofy I couldn't NOT post it!

The good:
Essie Mojito Madness!

Essie Mojito Madness
How gorgeous is this?!!?


Essie Mojito Madness

This is a part of the "Bikini So Teeny" collection, and I had been wanting a color like this for a while and I'm so glad this is the polish I picked up!  It applied like a dream and I barely needed 2 coats for it!  I did apply over a ridge filler, but I use that more to protect from staining.  Either way I bet it would still apply really well, this polish didn't get goopy or drag and it looks BEAUTIFUL.  Definitely recommend it.

The Bad:
Revlon Runway Pearl

Revlon Runway Pearl
4 coats!
I wanted to love this polish, it's a beautiful LE white/ivory with a red/orange/gold shimmer.  It's really stunning in the bottle.  BUT it goes on so thick, a little streaky, it took 4 coats to build opacity AND IT BUBBLED LIKE CRAZY.

Revlon Runway Pearl
THE BUBBLES! (editing note: I cropped and sharpened this using flickrs editing tools)

And you can see a little bit of the bottle in the above shot, the shimmer is really beautiful but the formula isn't worth the headache.

The Awesome:
Here are my "prom dress" nails!  Every time I looked at my nails I kept picture a puffy skirted sky blue dress with baby pink tulle that was covered in bits of silver glitter.  I have a major soft spot for froofy dresses, let me tell you.


Prom Dress nails!

This is OPI What's with the Cattitude topped with 2 coats of Pirouette My Whistle from the NYC Ballet Soft Shades collection that just came out and CND Raspberry Sparkle on top of all that.  I really like PMW, it's a mix of silver microglitter and white pearl hex glitter.  It's really beautiful and looks lovely over pastels.  It's the best picture I could get of my nails before I took this off but isn't it lovely?

And that's all I've got for today!  I've got another beauty post in the works for Wednesday and of course there's Friday Jams!  Thanks for stopping by!

love and cupcakes,
Ms. Meghan

Friday, May 25, 2012

Friday Jams: The Hoopy Frood Edition!

Happy Friday everyone!

I'm so sorry I missed my Wednesday post, I was just losing my mind this week and I got distracted and spooked watching a scary movie for 365 Days of Horror!  This is the 3rd guest post I've done, and I watched House on Haunted Hill!  Vincent Price sure is dreamy but it's a little disconcerting to watch the movie alone in your basement apartment.  You can read my review of HoHH here, and you can read my other two reviews if you're interested: Suck and Tucker and Dale vs. Evil.

But onto the jams!!!

Jam:
HAPPY TOWEL DAY EVERYONE!
If you are a hoopy frood then you know where your towel is, and you know that today is Towel Day!  Today is meant to celebrate the life and works of the late author Douglas Adams, who wrote The Hitchhiker's Guide to the Galaxy and all but one of its sequels.  It's crazy funny sci fi and they also made a movie, starring Martin Freeman, Mos Def, Zooey Deschanel, and Sam Rockwell.  Even if it's not book accurate it's one of my favorite movies, here's the trailer:
I just love this movie!  It's so charming!

Jelly:
REGINA SPEKTOR
Speaking of people I love, this lady is amazing.  And she has a new album out this Tuesday!!  In the meantime you can listen to a stream of the whole amazing record on NPR here!  Or watch the video for the single "All the Rowboats" if you're so inclined:
Eeee I'm so excited!  I really love this album, and I think it's better (or maybe just brighter?) than her last one.

Marmalade:
EGGPLANT BACON!
No that is not a word salad and I am not having a stroke, eggplant bacon is the genius invention of IsaChandra Moskowitz, as seen in her cookbook "Appetite for Reduction"!  But if you really wanna try it, she's also posted the recipe here!  My 2 tweaks: I toasted some spices (whole peppercorns, cardamom, coriander, crushed red pepper flakes and chunks of garlic) in a tiny pan and added the soy sauce to that with a little water and let that mixture heat up.  It's like a spicy soy sauce tea, but this adds more flavor without extra fat/calories; I let that cool before adding the liquid smoke and eggplanting it up.  And when I put the eggplant slices back in the oven for the last time, I sprinkled a little paprika on top because paprika is wonderful.  And this was so delicious!  I had an eblt with garlic hummus and OH MAN IT WAS WONDERFUL.  Definitely give this recipe a try, I wasn't even sure I liked eggplant but this made me a believer!

And that's it!  Happy long weekend friends, I hope you have a good one!

Love and cupcakes,
Ms. Meghan

Monday, May 21, 2012

True Confession: I love accent manicures!

Hi everyone!

I was so busy cooking tonight that I almost forget to put up a post.  Good thing I have a backlog of nail polish swatches to show you!!

So let's talk about accent manicures.  Generally speaking, I consider an accent manicure one where the whole hand is the same except for one nail which is usually, but not always, fancier than the rest.  Or it's just painted in a different color.  There's a variation on this where the thumb is the accent nail and it's called "Blackberry Bling".

I've been doing accent manicures since 2007, I started with a black creme and Sally Hansen Glow on my ring finger.  I wish I could find photographic evidence, or maybe I'll just do it and take pictures, either way it looks awesome!  I also liked to do black + a shimmery fuchsia accent.  Nowadays everyone is doing accent manicures.  But I still think they're pretty sweet, so without further adieu, here are 2 recent versions that I was particularly fond of:

Essie + SOPI accent mani
Essie "Armed and Ready" + SOPI "Don't Be Eggnog-ious" accent

Okay so I loved Armed and Ready in the bottle, it's a really interesting cool olive green with copper shimmer.  On the nails?  Less interesting, but it coordinates really well with the SOPI glitter, which is really nice and shiny.  I just wish it wasn't quite so dense. 

China Glaze accent mani
China Glaze Happy Go Lucky with a Pool Party accent.

OH MY GOD I LOVE THIS MANICURE.  It is one of my favorite manicures I've done this year.  Happy Go Lucky is a favorite polish of mine, I've worn it multiple times with no complaints from me, it's a nearly perfect yellow and it's so much fun!  And then there's Pool Party which is this eye searing neon reddish pink and these two colors just work so well together!  I did this manicure in January when I was bummed about winter and some personal drama and it cheered me up a little, which is pretty amazing because I'm kind of a grumpy person.

(Speaking of bright colors from CG, have you seen the summer collection?  TOTALLY SWOONING!)

And those are some of my favorite accent manicures, feel free to share yours in the comments!

love and cupcakes,
Ms. Meghan